1/ Everything from my cheap real DMD "ZeDMD" to my "Serum" (aka "cRom") file format and its editor "ColorizingDMD" are linked to freezy DMD-extensions, they are open-source and subjects to the same license, GPLv2. I DON'T EARN a thing from them (except perhaps some kind feedbacks and a place in the vpin world), not even a single Euro! My ZeDMD may be sold by any reseller who wants to but I don't want to get anything AT ALL from that!
2/ It is important to me that all the things I code or create remain in the open-source DIY side, so any concept from my code (like colour rotations) CAN NOT be used in encrypted/protected/closed-source code/file format but freely for any open-source project as long as you credit me!
Hello
First, I would like to thank Markus Kalkbrenner as he improved the ZeDMD so much that today he is the owner of the project. I must thank @Freezy and @Lucky1 (and certainly others) for all the hard job they did for us to provide real DMDs with our vpin machines. Since 06/07/2022, ZeDMD has officially be added to @Freezy dmd-extensions project https://github.com/freezy/dmd-extensions, thanks to him for help and support! I would like to thank the coders of the library ESP32-HUB75-MatrixPanel-I2S-DMA at https://github.com/mrfaptastic/ESP32-HUB75-MatrixPanel-I2S-DMA/.
Also, if you install a ZeDMD, could you just write commentary, if you have problems, obviously we'll try to fix it together, but even if it perfectly works. I would like to have a ratio "installation with problems/working installation". Just a "I installed it, it works". Thanks!
I coded a new real DMD device compatible with Visual Pinball with any rom (colorized rom included), with UltraDMD, with Pinball FX3, with the frontend Pinup System or any other emulator or frontend (not tested, but there is no reason it will not work).
It should be soon available with its dmd-extensions project and so will be available for download here https://github.com/freezy/dmd-extensions.
I - Installing ZeDMD
First let's see it working on Visual Pinball X (sorry at the test time, I had 2 different pannels as spare parts, but you see that it works with many different pannels):
with a 4 color rom:
with a 16 color colorized rom
[Update 04/05/2022] with a 64 color colorized ROM
[Update 04/05/2022] with frontend Pinup System (RGB24 mode)
[Update 04/17/2022] 192x64 LEDs DMD with Sega Baywatch colorized ROM
[MISE-A-JOUR du 08/05/2022] ZeDMD 256x64 avec la ROM colorisée 64 couleurs Tales of the Arabian Nights
[MISE-A-JOUR du 08/05/2022] ZeDMD 256x64 avec la ROM colorisée 64 couleurs Baywatch
Here is the full installation guide.
1/ Shopping list
The interest of this new PinxDMDx is the price: The micro-controller used is a cheap (but powerful) ESP32.
The device is sold for barely 5€ on AliExpress (https://fr.aliexpress.com/item/32813938236.html) and, if you're in a hurry, for 12€ on Amazon (https://www.amazon.fr/AZ-Delivery-NodeMCU-d%C3%A9veloppement-d%C3%A9nergie-successeur/dp/B071P98VTG/ref=asc_df_B071P98VTG/). Caution: There are many variations of the ESP32, in the Github of the library used to display on LED matrix pannels, we can read "RISC-V ESP32's (like the C3) are not, and will never be supported as they do not have parallel DMA output required for this library.". The majority of the ESP32 µC should work, you can see a list of all the board tested and compatible in one of the answers in this thread below.
Two 64x32 LED-matrix panels any pitch you want (the standard is 2.5 and more that 4 could seems huge) as far as the scan rate is 1/16 or 4 64x64 LED-matrix panels or 2 128x64 LED-matrix panels as far as the scan rate is 1/32 (For the 64-high panels, we'll take a small pitch like 2 or even 1.875). Even with those pitches, the DMD will be larger than a real one, for example 4 64x64 in P2 will be 512mm wide. Check that it complies with what you expected visually in your vpin machine. The price doesn't change a lot from one pitch to another, between 15 and 25€ each. Here is a 64x32 P3 https://fr.aliexpress.com/item/32844117147.html that should fit, but there are little chances others don't work. A 64x64 that I tested is https://fr.aliexpress.com/item/1005003637651166.html. It's hard to know before buying, but your 32x32 or 64x32 matrices MUST have the "D" PIN connected and your 64x64 or 128x64 matrices MUST have the "D" AND "E" PINs connected in the diagram sometimes available behind the panels: On the first diagram, neither "D" nor "E" are hardwired, this matrix is not compatible with ZeDMD. On the second diagram, the "E" PIN is not hardwired, this matrix works with ZeDMD only if this is a 32x32 or 64x32 pannel, not if this is a 64x64 or a 128x64 panel, for those last, you NEED a matrix connected like the third diagram. DON'T HESITATE TO CONTACT THE RESELLER AND ASK PROVIDING THE ABOVE DIAGRAMS, EVEN IF HE IS IN CHINA!
You should already have one, but you'll need a 5V power supply able to deliver 2A current just for the pannels (so more if you use it for something else). Switch-mode ones with a little screw to adjust the voltage would be your best bet as there are many (most of them?) pannels that display some artifacts/blurry image (see below) if supplied with 5V power, you need to reduce the voltage often between 4V and 4.5V.
It's a WIP, but I'm on designing a ESP32-to-HUB75 shield that would make connecting the µ-controller to the pannels really easy!
But the last is not mandatory, you can go with the ESP and the 2 pannels, so for around 50€, you got a fully compatible real DMD. Without the shield, you need 16 male/female Dupont wires. The shorter, the better to avoid interferences, I use 10cm ones
2/ Code for the ESP32
CAUTION: even if you have an ESP32/shield/frame with its code already injected, you must check that your ESP32 is found by your PC in the device manager (look at the third point below). If not, just install the drivers as explained in the second point below.
Now, we are going to inject the code to the ESP32.
Download the latest release and uncompress it in any directory you like https://github.com/PPUC/ZeDMD/releases
Connect your ESP32 to the PC via the USB plug, if not already done. You may have to install the drivers if the device is not automatically recognized. According the ESP32 version, you may have to install this one https://www.silabs.com/developers/usb-to-uart-bridge-vcp-drivers?tab=downloads for a "CP210x" chip (take the "Universal Windows" one as it seems that there may be problems with other ones), this one https://sparks.gogo.co.nz/ch340.html for a "CH340" chip or the one named CH343xxxxx here https://www.wch-ic.com/downloads/category/30.html for a "CH9102" chip.
You need to know to which COM port the ESP32 is connected to. For that, click on the Windows button, directly type "device manager", launch it and then, in the "Ports (COM & LPT)" section, look for the "Silicon Labs CP210x USB to UART Bridge (COMx)" or "USB-SERIAL CH340 (COMx)" (according your chip) and note the number beside the COM (the one replacing the "x" in "COMx").
In the directory where you uncompressed the downloaded file, click on "flash ZeDMD WWWxHH.bat" (where you'll replace "WWW" by the width of your panel and "HH" by the height). When prompted, enter the number you found in the device manager. Type Enter then wait till the transfer is over. Caution: this is a common problem with the ESP32 that the upload never starts and this display shows that the connection is never done: In this case, you just need to press and hold the "BOOT" button until the upload starts. When it is started, you may release it.
That's all for the µ-controller.
3/ Code for the PC
CAUTION: even if you have an ESP32/shield/frame with its code already injected, you must check that your ESP32 is found by your PC in the device manager (look at the 2/ above)
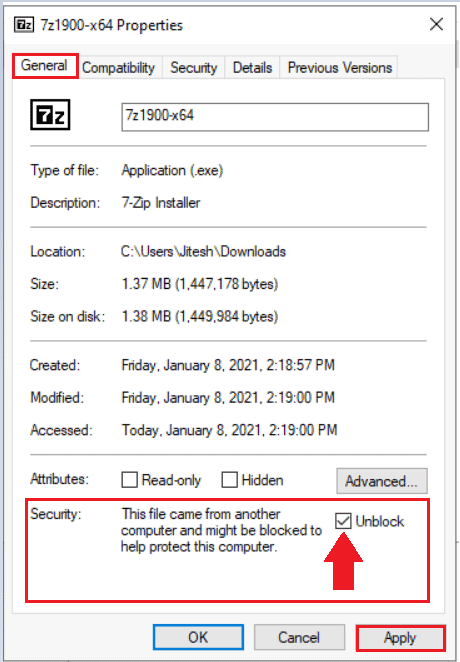
Use the latest version available of freezy's DMDext here https://github.com/freezy/dmd-extensions/releases and copy the files in your "Visual Pinball\VPinMAME" directory. If asked to replace files, click "Yes to all". Right click on each ".exe" or ".dll" file and then "Properties". If the box "Unblock" is there at the bottom right of the Properties window, check it and click "OK"
Open the file "DmdDevice.ini" with any text editor (Windows notepad is perfect) and if you have the lines:
Code:
[zedmd] ; if false, doesn't bother looking for a ZeDMD enabled=false
modify the last line to have
Code:
enabled=true
If you are using Pinup System, do the same below with the "[pinup]" option
Check that you have at the beginning:
Code:
; how to scale games to smaller or larger displays: fit, fill or stretch resize = stretch
; flips the image horizontally fliphorizontally = false
; flips the image vertically flipvertically = false
; enable or disable frame-by-frame colorization (inactive in VPX bundle) colorize = true
; scaler mode for standard content (vpm frames): doubler, scale2x. ; note: see readme.md for details scalermode = scale2x
ZeDMD now automatically detect and scale to your DMD resolution so always set the scaletohd to false:
Code:
; always scale standard vpm frames to 256x64 ; note: see readme.md for details scaletohd = false
To avoid problems later on, check that you don't have any other version of dmddevice.dll or dmdext.exe on your disk (mainly in the Vpinmame subdirectories)
That's all!
4/ The hard(ware) part
If you decided not to buy a shield, you must connect everything. Check the V/ if you don't want to bother with that! With each LED matrix pannels, you should have 2 cables:
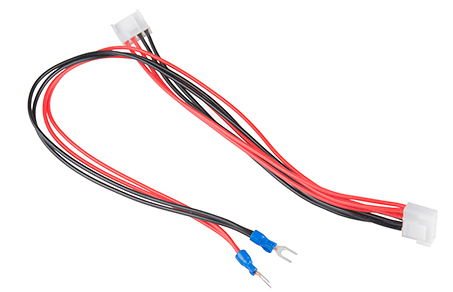
first the power supply one that looks like this
Connect the metallic connectors to the power supply (black to the GND and red to the +5V) and the plastic plug to the corresponding plug at the rear of the pannels (it can only be inserted one way, no risk of error). With one cable as the one above, only one is needed to connect both pannels
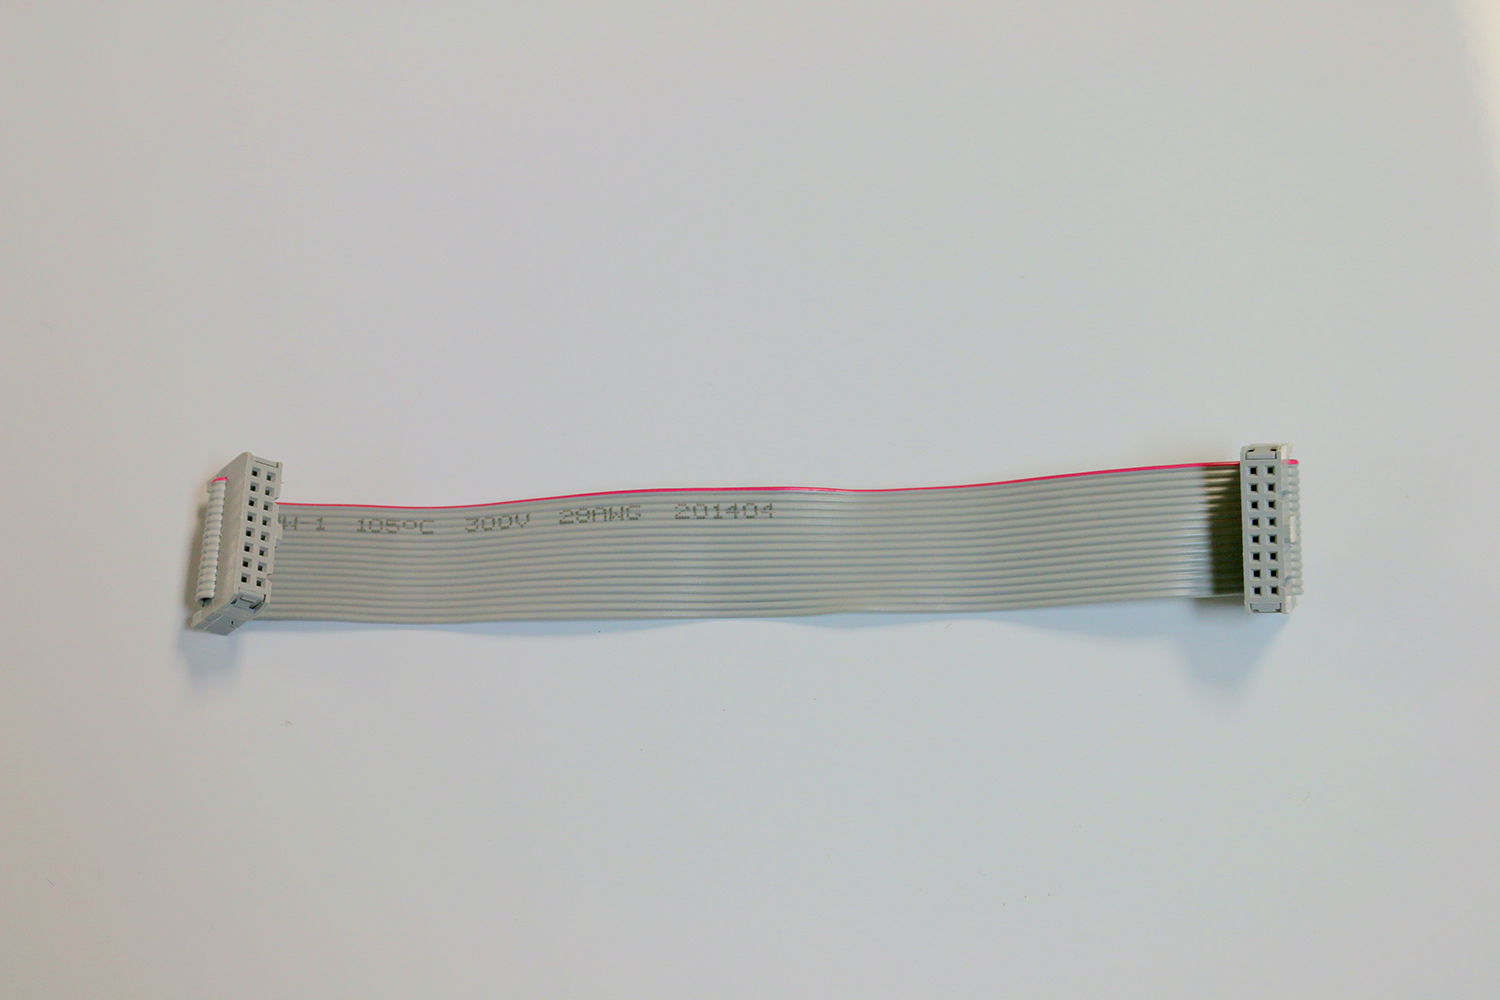
then the data cable (16 pin plug called "HUB75")
As the pannels are chainable, there are 2 plugs at the rear of each pannel, one IN and one OUT. Once again, you can only plug the cable one way, so no risk of mistake. We'll connect the pins of the ESP32 to the IN of the first pannel and the OUT of the first pannel to the IN of the second. But how recognize the IN from the OUT?
White arrows shows the direction the chain should be, so in the above picture, the data enter to the left and exit to the right. The ESP32 is connected to the left plug and the right plug is connected to the left one of the second pannel. So the connection between the two pannels is easy, juste use one of the 2 cables you have. The hardest part is for the connection between the ESP32 and the first pannel. If you turn the cable with the end that should be connected to the ESP32 towards you with the red wire to the top, it looks like this:
The other info we need is the corresponding connection to the ESP32. In the file "ESP32-HUB75-MatrixPanel-I2S-DMA.h" of the "ESP32-HUB75-MatrixPanel-I2S-DMA" library, we can find that for all ESP32 except the ESP-S2 and the ESP-S3, we have:
The "LAT" in the above list is the same as the "Strobe" in the male HUB75 picture. You must connect at least one GND from the ESP32 to one GND of the HUB75. (The pin "E" should only be connected if you are using 64-LED high panels, if less, you can ignore it). Now, the pinout of the ESP32 depends on the version you have.
The common 38-pin pinout: The common 30-pin pinout:
So take your time and connect one male Dupont wire to the HUB75 cable and the other end (the female) to the corresponding pin of the ESP32. For an example: The top left hole of the HUB75 is "G1", in the list, we see that it should be connected to the pin GPIO26 ("#define G1_PIN 26") of the ESP32, so connect it to the 10th left pin from the top of the ESP32. Caution: the male pins on the ESP32 are at the rear of the µ-controller, so if you flip the board (keeping the USB connection at the bottom), of course, the left pins become the right ones...
At the end, put a rubber band around the HUB75/male Dupont connection to be sure it won't move any more.
Eventually, you'll get something like this
And you are done!
5/ Short final configuration
So you can start your Visual Pinball X and launch any table that previously worked without your new device for test.
When a table is running, press "F1" and check the "Use external DMD (dll)" box, click "OK" then press "F3" to restart the table
You've seen that if you got a blurry display on your ZeDMD, it's certainly because the voltage is too high. So if you have a switch-mode power supply, you can lower the voltage with the little screw until it is clean.
If you have another type of power supply, you can use diodes to reduce the voltage like in this video
Each diode reduce the voltage by 0.7V. Caution to the polarity: connect the side WITHOUT the grey ring of the diode to the + of the power supply.
The pannels don't have the same order in the colors. Each LED in the pannel has 3 subLED, 1 red, 1 green and 1 blue. The ZeDMD initial test pattern colors should be exactly the same as the ones at the very beginning of this post (if you have a SD ZeDMD, the HD logo won't show):
so red in the top left, green in the bottom left and blue in the top right. If you have not this, your pannels are not ordered RGB, but perhaps RBG or BGR or... I added a little extra code for the ESP32: if at initial pattern time, you repetedly make contact between the GPIO21 and the GND (pins of the ESP32), it will rotate through all different combinations possible of the R, G and B. Stop when you have the correct order. You only need to do that once, it will be recorded.
You can change the brightness too during the initial pattern display. The light intensity change with a step of 10 between 15 and 255. You only need to make contact between the GPIO33 and the GND. The actuel value is shown at the bottom center, below the "ZeDMD". Once again, it will be automatically saved and not need to be done everytime.
This tuto is over, hope you'll enjoy your ZeDMD, don't hesistate to comment or ask for help or for improvements!
II- Reminder on how to install colorized ROMs (16 or 64 colors):
Due to the new PAC format, uncompatible with the ZeDMD, the previous VNI/PAL format files are not as easy as before to find. Anyway, there are lots of links in the Pincab Passion page made by @peskopat here https://www.pincabpassion.net/t10371-tuto-roms-colorisees-palettes-v3 where you can still download these formats. My Serum file format follows the exact same way to be installed as VNI/PAL.
Method to install these ROMs:
In the directory "C:\Virtual Pinball\VPinMAME", create a directory "altcolor"
We are going to take the example of the 64-color colorized ROM for "Tales of The Arabian Nights" downloadable here https://vpuniverse.com/files/file/5532-tales-of-the-arabian-nights/. I assume that you already have the table installed and working with its VPX, DB2S and ROM files (the last being "totan_14.zip").
You must create a directory in "altcolor" with the name of the ROM (without ".zip"), so "totan_14".
In this directory, uncompress the .vni and .pal files from the zip file you downloaded from VPUniverse. If they are not called "pin2dmd.vni" and "pin2dmd.pal", rename them this way. For Serum files, just copy the file name_of_the_rom.cRZ (as you see, it must have exactly the same name as the rom followed by ".cRZ)"
Launch the table in VPX, either it is working directly, or you need to press "F1", check both "Use external DMD (dll)" and "Colorize DMD" boxes, click "OK" and press "F3" to restart.
The structure of the subdirectories of VPinMAME should be:
The compatible panels is determined by the ESP32 HUB75 library used. I use this highly optimized one https://github.com/mrfaptastic/ESP32-HUB75-MatrixPanel-I2S-DMA/. So the indications given in the GitHub would be a good base:
Another clue is to know if the HUB75 "D" port, for 32-LED-high-1/16-scan matrices, or the "D" and "E" ports, for 64-LED-high-1/32-scan matrices are connected or simply GND wired. The library used needs these ports to be connected, so they must NOT be connected to the GND as shown in the next diagram:
Not Compatible Compatible with 32-LED-high DMD Compatible with 64-LED-high DMD
Regularly, the matrices have this type of diagram at the rear, next to the HUB75 plug, but the information is hard to get before buying the device. You should try to ask the reseller before buying, most of them answer quickly! So, to be sure to get a working one, we just have to stick to the ones that have already been buyed by a Pincab Passion fellow.
Tested 32-LED-HIGH matrices which are compatible (if they were not changed):
IV- Make your ZeDMD works with Pinball FX3 (version Steam) and UltraDMD tables
1- PinballX
It's really simple, download the 32 bit version of PinballX:
Then during installation, don't forget to uncheck the box "Install 64 bit (x64) version":
Finally, just copy all 3 files dmddevice.dll, dmddevice.ini and serum.dll (even if this last is not necessary) working with ZeDMD in VPX, from the directory "visual pinball\VpinMame" to the directory "PinballX" and you are done!
2- Pinball FX3
First, be advise that the display on real DMD of Pinball FX3 DMD is terrible!
So to make it work, you need to launch dmdext.exe before launching the emulator. The command line is: "C:/Program Files (x86)/Steam/steam.exe mirror -s pinballfx3 -d ZeDMD"
So go to the configuration of your frontend and add this line in the launch script. For example, for Pinup frontend, launch PinUpMenuSetup.exe, go in the tab "Popper Setup", click on "Emulators", to the left of the new window, choose "Pinball FX3", then go to the tab "Launch Setup". Here, in the Launch Script, enter:
On the Pinball FX3 side, you must have activated the cabinet mode, for that, you may follow the tuto here https://www.pinballfx.com/?page_id=7754.
Then still in this cabinet option page, enter these figures:
With that, it should work!
3- UltraDMD
Sorry about the colors on the left panel (right in the video), as my spare right and left panels don't have the same R, G and B order.
We are going to use FlexDMD.
Download FlexDMD.zip here https://github.com/vbousquet/flexdmd/releases.
Un-7zip all its content in your "C:\Visual Pinball\VPinMAME" directory.
Check that the dll and exe files are not blocked (shouldn't be with 7ZIP).
Launch "FlexDMDUI.exe".
If you use only 32 bits exe and dll, you can ignore if you have a red cross "DmdDevice64.dll was not found...".
If there is a red cross for "FlexDMD", click on "Register", it should then change to a green "V". Do the same for "UltraDMD".
Click the "UltraDMD" tab then you can check "Full color" or "Monochrome" on the left. For 128x32, full color it is quite OK, but it lags a lot on 256x64.
V- Using a shield to make the connection ESP32-HUB75 mush easier:
You have the choice between 2 shields from 2 nice members of Pincab Passion:
@Benoit33 propose it in his online shop here http://benfactory.fr/produit/zedmd-shield/ at much lower price if you contact him here in pincab passion (-10€!)
@arnoz propose it in his online shop here https://shop.arnoz.com/fr/dmd/87-esp-dmd-shield.html
The price are equivalent as arnoz one is soldered (as the Benoit33 20€ version), but without the ESP32 (that you can find an ESP32 for around 5€ on AliExpress). So it's up to your taste.
They both deserve my big thanks for their help all along the development of the device.
This is one example on how to do it, there are many other ways, but this is a quite easy way and above all, really cheap.
If you take non rigid LED matrices, the method is different, it uses magnets
In the next description, "WiD" will stand for "Width of the total DMD in mm" and "HeD" the same for the height. It is quite easy to calculate if you don't want to measure, a 128x32 DMD with P3 matrices is WiD=128x3=384mm and HeD=32x3=96mm. We will keep this example for all the explanations. In tyour case, you've got to adapt to your resolution and pitch.
Needed hardware:
An aluminium bar (the thinest possible, 2 or 3mm are enough, and around 20mm width). For the length, at least twice WiD + around 20cm (or 200mm, so in our example, Wid x 2 + 200 = 968mm). We can find it for around 6€ in DIY-stores.
The cheapest wood board you can find (particleboard, plywood, OSB, whatever you find). It must fits within the inner width of your front cab, so its width must be adjust to the size between the lateral planks of the front cabinet. Its height must be at least HeD+50mm (in our example 146mm). For the wood thickness, the closest to the LED matrices thickness is the best. If not exactly the same, prefer the wood to be thicker for the DMD not to exceed the wood.
Some screws to fix the LED matrices to the bars, often you need M3 screws. Check the length to be short enough, maximum 10mm, but 5 or 6 should be enough for a 3mm-thick bar. You should need 8 of them.
4 screws to fix the bars to the wood. Short ones not to exceed the thickness of the wood and the highest the diameter to be fixed tightly. M5xM16 could be perfect.
1/ Setting up the aluminium bars
Cut the aluminimum bar in two LaD+100 (=484mm in our example) length
On a flat surface, place your matrices the back facing up, in their final position, ie perfectly aligned and side by side with no space between them, then you need to measure accurately the distance between 2 adjacent screw holes that will be used:
The distance within the same matrix, here 273mm and between 2 adjacent matrices here 18mm.
You are going to trace the center of these 4 holes on each aluminium bar, centered in the length direction. Drill with a drill bit which diameter is a little larger than the M3 screws (so 4mm should be OK). At the end, once screwed to it, the LED matrices should leave 5cm of aluminium bar on each size (high accuracy is not that important for that, if that's 5.3 and 4.7, that's still OK).
Finally, drill a hole for the other screws on each end of the bars, to fix them to the wood frame:
2/ Setting up the wood frame
This is really simple: draw a rectangle in your wood board centerd on both direction exactly the size of the DMD (WiD x HeD) and cut it the more accurately possible with a jigsaw (you'll need to drill holes to put the jigsaw blade inside the rectangle). I didn't do it, because it was just for the tuto, but you'll certainly need to paint the frame (with black color, or whatever).
3/ Final assembly
Assemble you matrices on the bars with the M3 screws (and if needed, use washers). They need to be perfectly alined and side by side with no space between them, but your screws should be loose and let you move the matrices a little bit. (All the next images and video are made with a 256x64 P2 ZeDMD)
Insert them in your wood frame and fix with the other screws to get:
To fix all that in the front cabinet, use brackets or wooden strips.
And that's all:
You'll certainly want to put speakers on each side of the DMD. That's easy to drill a circle hole for each and fix them to the rear of the frame (check the shape and size of your speakers to adapt to the remaining space on each side of the DMD).
Sujet: ZeDMD - Awesome HiQuality, Low cost, DIY Pinball DMD for Everyone. Thank You Dim 26 Fév 2023 - 11:36
To the creator and contributors of ZeDMD I want to thank you so very much for your awesome work in creating, programing and instructing us how to build our own ZeDMD for our pinball cabinets, that is cost friendly and using available parts. The Quality is No1. Installed in my Cabinet 2 weeks ago, have only tried with VPX and works amazing.
I built my pinball cabinet back in 2014, using 3 monitors, but was never really happy with the DMD monitor, it always looked bland to me. I have always wanted to put an real LED DMD but the cost was always a negative. So i just put up with it. The past 3 1/2 years my pinball cabinet had been untouched in the garage due to shifting home and being busy with 2 young toddlers.
Then in January 2023 had some time and I was curious what the latest updates in Virtual Pinball's was, then I stumbled upon ZeDMD.
Oh my it got me excited, ordered the parts and dusted up my pinball cabinet, installed the ZeDMD and to my amazement, it is what was missing from my cabinet. Now It Rocks.
I tested - World Cup Soccer (Bally1994) with coloured ZeDMD, all I can say is WOW it pops. I introduced this to my 4 year old and watching him play and being excited is priceless. Thank you ZeDMD, much appreciated.
**** Now I am curious if I can use a ZeDMD as a Marquee on an Aracde cabinet some how ****
Thanks @galagadreamteam for your great comment! I have spent (and still continue to spend) many hours on ZeDMD and as I don't earn money from it, comments are my only rewards.
Zedrummer thank you for your reply, will check it out
kind regards galagadreamteam
zedrummer aime ce message
JoeBowler300
Messages : 7 Département : Home
Sujet: LED Panel Compatability Check Jeu 13 Avr 2023 - 20:00
Hello, first Thank you for this project! This looks awesome!
I bought 2 of these panels that you linked that you tested and said passed. https://www.aliexpress.us/item/3256804809679168.html (128x64)
I have some questions about them. Can they be put together side by side? The arrows only go up and not sideways to the left or the right. And the ribbon cables are too short to connect side by side, but will connect on top of each other making a 128x128 display. If so, then a longer ribbon cable will be needed.
The Hub75 connector on the panel don't have an "E" and "D" but an "N" instead in those positions. Is this okay? Will this still work for the 256x64 display?
The orientation of the socket is different than the indoor P2 panel, that makes Arnoz's shield cover the power pins to the panel. Unfortunately they do not make adapters that offset the hub 75 socket to make it further Eastward to prevent the shield from covering up the power connection. They do make offset adapters that will move it northward or southward but unfortunately the shield will still be over the power pins.
The hyperlink to "Ones interested in internals of such matrices could find this article useful." Doesn't work because it's an image of the text. Can you pass the hyperlink please?
@JoeBowler300 sorry, I didn't get the mail notification for your message. I hope this is not too late. I worry a little for you, the picture you provide of your panels is really different from the ones on the aliexpress website. Each panel has only one HUB75 plug and you need two of them as shown by the reseller to chain them:
And if you say that there is "N" for "D" and "E", that's another problem. You really can't use these panels at least for the first reason, sorry.
But as the panels seem very different from what is displayed on the website, I think you can easily start a dispute on Aliexpress. Sorry again for the late answer.
Okay good to know. I guess I’ll use those panels on another project. Cheaper to keep then to ship back. I’ve ordered the other indoor panels with the 2mm spacing. I will let you know when or if I get this working. Again thank you! This project excites me.
Sujet: Re: ZeDMD installation (English) Mer 10 Mai 2023 - 8:03
I got my new p2 LED panels. Practically Plug-N-Play! Happy to say it’s working!
Thank you for all your work on this to make it happen.
Also, you never did answer this in my first post.
The hyperlink to "Ones interested in internals of such matrices could find this article useful." Doesn't work because it's an image of the text. Can you pass the hyperlink please?
I am interested in learning more! Thank you.
zedrummer aime ce message
zedrummer Modérateur
Messages : 7535 Département : 68
Sujet: Re: ZeDMD installation (English) Mer 10 Mai 2023 - 8:13
Thanks a lot @JoeBowler300 for your kind message Sorry, I've missed your request on the first post. It's available in the site linked above the image https://github.com/mrfaptastic/ESP32-HUB75-MatrixPanel-DMA in the "Supported Panels" part of the readme.md file. Here is the link you are looking for https://www.sparkfun.com/news/2650.
Sujet: Re: ZeDMD installation (English) Sam 20 Mai 2023 - 16:25
To all the owners of a ZeDMD, you should... no YOU MUST update your firmware and @freezy 's dmdext! You may expect HUGE speed and compatibility improvement thanks to Markus Kalkbrenner amazing code changes. Caution: the Github for the updated ZeDMD firmware has now changes to https://github.com/PPUC/ZeDMD/releases for dmdext, no change, this is here https://github.com/freezy/dmd-extensions/releases
CAUTION: if your dmddevice.ini has a section "[ZeDMD]" with uppercase letters, change it to "[zedmd]" fully lowercase.
Sujet: Re: ZeDMD installation (English) Dim 1 Oct 2023 - 7:06
Got it ZeDMD going today! Thanks so much. Now to get some color going and a more permanent place for this. I used an Arnoz shield and Smallcab P3 leds.
Fichiers joints
IMG_1366-compressed.jpeg
Vous n'avez pas la permission de télécharger les fichiers joints.
(250 Ko) Téléchargé 4 fois
FullSizeRender-compressed.jpeg
Vous n'avez pas la permission de télécharger les fichiers joints.
(97 Ko) Téléchargé 1 fois
Dernière édition par locohombre le Dim 1 Oct 2023 - 8:26, édité 1 fois
zedrummer aime ce message
zedrummer Modérateur
Messages : 7535 Département : 68
Sujet: Re: ZeDMD installation (English) Dim 1 Oct 2023 - 8:11
Sujet: Re: ZeDMD installation (English) Jeu 4 Jan 2024 - 5:16
Hello,
Thanks for this awesome project. Its a very good and cheap alternative to other solutions. For me it was easy to get it to work. But i have a problem with the displays. When power is on and connected i have no clear image on sceen. One seems darken than the other and i think there are some leds that should not shine.
What can i check or is this behavor normal?
There are "stripes" before the score like a shadow.
zedrummer Modérateur
Messages : 7535 Département : 68
Sujet: Re: ZeDMD installation (English) Jeu 4 Jan 2024 - 7:57
Hello Could you post a photo please? It's not that easy to help from a text description.
Bensen
Messages : 12 Département : Private
Sujet: Re: ZeDMD installation (English) Jeu 4 Jan 2024 - 8:26
Yes, sure.
Bensen
Messages : 12 Département : Private
Sujet: Re: ZeDMD installation (English) Jeu 4 Jan 2024 - 8:27
zedrummer Modérateur
Messages : 7535 Département : 68
Sujet: Re: ZeDMD installation (English) Jeu 4 Jan 2024 - 8:30
Ok try reducing the voltage. Your led panels must expect something like 4.2V and not 5V
Dernière édition par zedrummer le Sam 6 Jan 2024 - 12:39, édité 1 fois


 Jeu 31 Mar 2022 - 18:51
 It's hard to know before buying, but your 32x32 or 64x32 matrices MUST have the "D" PIN connected and your 64x64 or 128x64 matrices MUST have the "D" AND "E" PINs connected in the diagram sometimes available behind the panels:


 To all the owners of a ZeDMD, you should... no YOU MUST update your firmware and
  IMG_1366-compressed.jpeg

